Communication
2.1 Interacting through technologies
Learning outcome: After this module you will be able to interact through a variety of digital devices and applications and to download apps on mobile phone and computer.
2.1.1 Smartphone and apps
How to download apps
Where you get your software from, depends on what type of smartphone you have. The two big mobile systems of today – Android and iOS – come with browsable online websites and accompanying app stores that are built-in as part of the operating system of the phone.

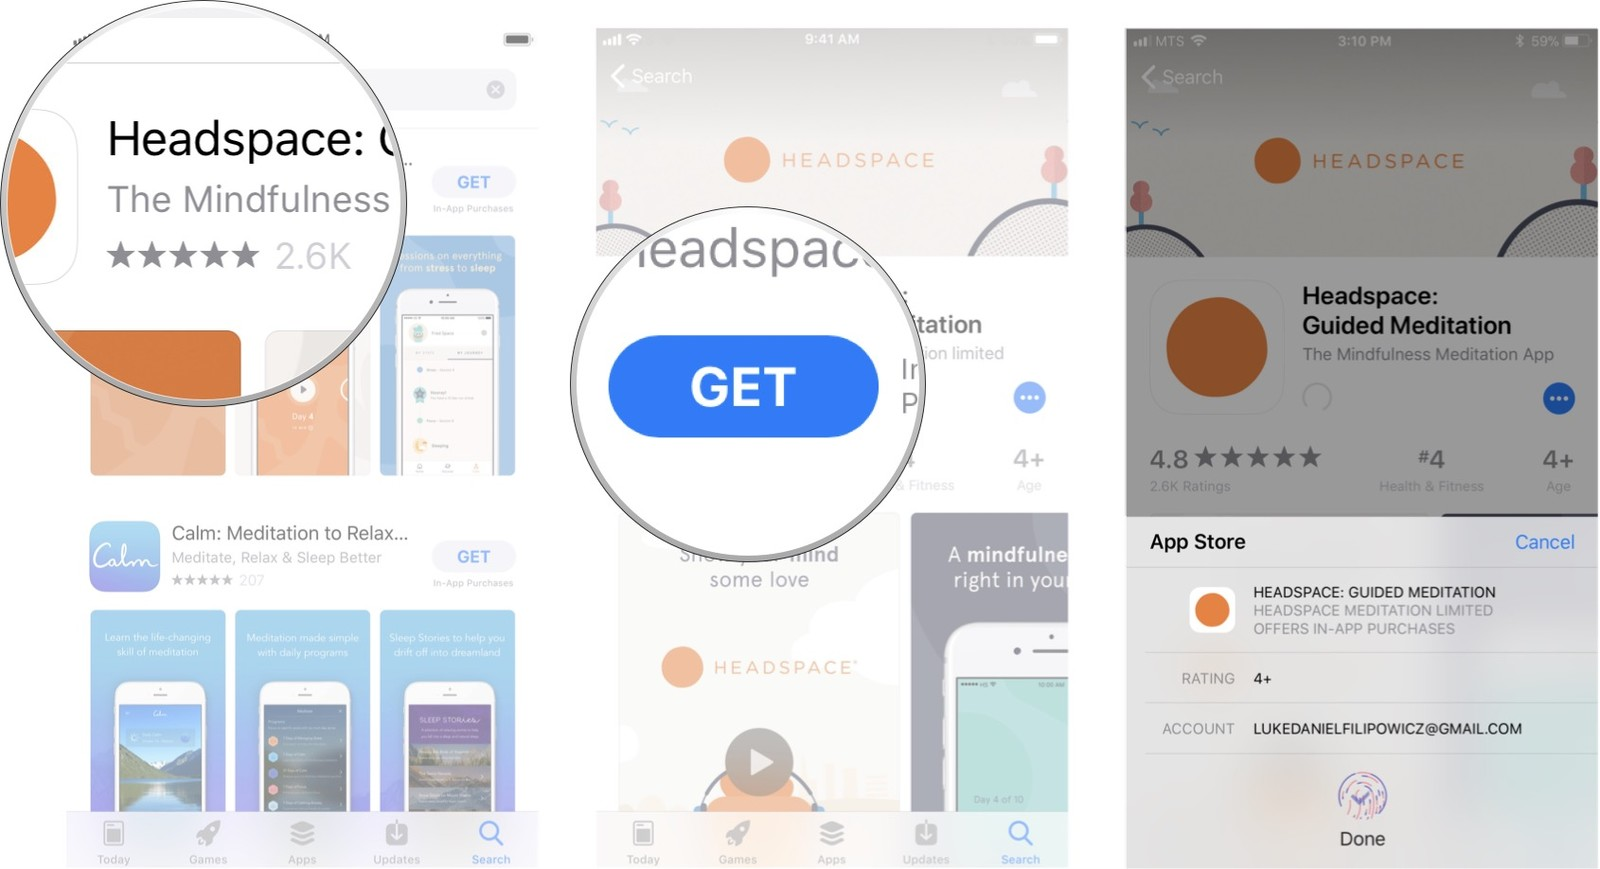
Examples for iOS:
- Launch the App Store.
- Tap the magnifying glass on the bottom right of your screen.
- Type in for what you are searching ant tap search button.

Once you’ve found the app you want, it’s time to download and install it.
- Tap the app you wish to download.
- Tap ‘Get if it is free’, or the price of the app.
- Place your finger on the home button to activate ‘Touch ID’ and confirm your identity.
2.1.2 Computer and apps
The Windows Store provides software from big-budget games like ‘Rise of the Tomb Raider’ to casual titles like ‘Asphalt 8’, as well as applications like ‘Adobe Photoshop Express’ and the ‘VLC media player’. All you need for work and leisure.
Here is how to install apps in Windows 10:
1. Tap the Windows icon.

2. Select the Windows Store icon.

3. If you logged into with your Microsoft login, look at step 7. If you are using a local account, Tap the ‘Add user’.

4. Select Sign In

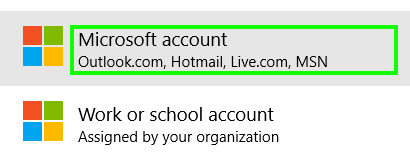
5. Select Microsoft account
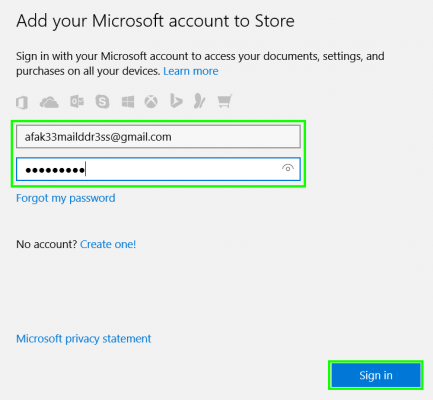
6. Enter your username and password. Select ‘Sign in’. (If you don’t have a Microsoft account, go to https://account.microsoft.com/account?lang=en-hk on your computer.)
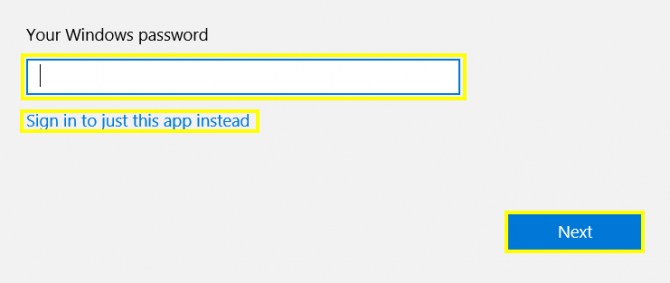
o (Possible extra step: Enter your PC’s login password and select ‘Next’ to change your login account to your Microsoft account, or click ‘Sign in to just this app instead’ to keep your PC’s login as-is.)
7. Find an app you want to download. For this exercise choose a free app. Click the ‘Free’ button.

2.1.3 Exercises
The second exercise. Practice
Download a free app of your interest for your mobile phone from Google Play or App Store. Do the same thing on your computer.
2.2 Sharing information via social media and digital networks
Learning outcome: After completing this module you will be able to share with others your current location and other information.
2.2.1 Sharing your location
It isn’t always recommended to share your location, but sometimes it is useful. For example, if you need to meet somebody or need to be picked up, and don’t know your exact position (or you’re bad at explaining directions). There are many apps for sharing location; for now, we’ll look at how to do it via Google maps and Messenger.
These step-by-steps are copied from Source. If it looks different on your phone, it might have been an update so please check Google support.
Android:
If your friends have a Google Account
1. If you haven’t already, add their Gmail address to your Google Contacts.
2. On your Android phone or tablet, open the Google Maps app and sign in (if you’re not signed in already).
3. Tap Account Circle  Location sharing
  Add people
  .
.
4. Choose how long you want to share your location.
6. Choose who you want to share with.
7. Tap Share.
If they don’t have a Google Account
1. On your device, open the Google Maps  and sign in.
2. Tap Account Circle Location sharing Add people .
3. Tap More  Copy to clipboard. People with this link can see your location for as long as you choose, up to 72 hours.
Share using another app
You can also share through other messaging apps via Google Maps. Tap More select an app.
Stop sharing
1. Open the Google Maps app.
2. Tap Account Circle Location sharing.
3. Next to the person with whom you want to stop sharing, tap Remove  .
.
iPhone and iPad:
If friends have a Google Account
- The location sharing at this point is the same as using Android phone or tablet.
If they don’t have a Google Account
To send your location to someone who doesn’t have a Google Account, share your location with a link.
1. On your iPhone or iPad, open the Google Maps app and sign in.
2. Tap Account Circle Location sharing Add people .
3. Tap Message to send via iMessage, or More select a different app. People with this link will see your real-time location for as long as you choose, up to 72 hours.
Messenger:
For iOS
- Tap the ‘Location’ icon or ‘More ‘icon and select ‘Location’.
- You will see a map of your current location and the option to share your Live Location.
- If you choose to share your Live Location, the person will be able to see where you are for 60 minutes.
- You’ll be able to see an estimate time of how long it will take to reach your friends.
- You can stop sharing your Live Location at any time; Tap ‘stop sharing’.
- A small clock of the map let you know how much longer you’re sharing your location for.
For Android:
- Open the ‘Messenger’ app
- Click on the contact (person or group) you want to share position with
- Click ‘More’ (::) at the bottom of the screen.
- Click arrow icon ‘Location’.
- The map pops up -click ‘Share current location for 60 min’.
2.3.2 Sharing images on social media
Facebook:
- For this exercise you will need a Facebook account
- Open your Facebook on your mobile phone/computer.
- Go to facebook.com and log in.
- Go to facebook.com and create an account.
- If you don’t want to have a Facebook account -just read this exercise to yourself.
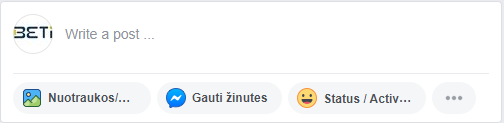
- When you open Facebook it automatically gives you the ‘Write a post’ option:
- Select the ‘Photo’ option. Click ‘Photo/Video’ or tap ‘Photo’ or ‘Photo/Video’ below the status box (mobile).
- Click the photo you want to upload. Note that you should be careful with sharing pictures of other people without their permission.
- If you want to upload multiple photos at once on desktop, hold down the Ctrl key (Windows) or ⌘ Command (Mac) while clicking each photo you want to upload.
- To upload multiple photos at once on mobile, tap each photo that you want to upload.
- Confirm your selection. Click ‘Open’ (desktop) or tap ‘Done’ (mobile).
- Post your photo(s). Click ‘Post’ in the status window to upload your photo(s).
Instagram (on mobile phones only):
1. Open Instagram. Tap the Instagram app icon to do so.
2. If you aren’t signed into Instagram, enter your Instagram account’s email address (or username, or phone number) and password before continuing.
3. Tap  . It’s at the bottom of the screen. Doing so will bring up a list of your phone’s or tablet’s photos.
4. Select a photo. Tap the photo that you want to upload. Again, remember to ask for permission if you chose pictures of other people.
5. Tap ‘Next’. It’s in the top-right corner of the screen.
6. Select a filter. Choose the filter that you would like to apply. You can skip this step.
7. Tap ‘Next’.
8. Add a caption. Tap the text box, then type in some caption for your photo you are going to publish. It may be left empty.
9. Tap ‘Share’. It’s in the top-right corner of the screen. Photo shared.
Google Drive:
Google Drive has options for creating, storing sharing and collaborating on content. It is more an online work space than a social media. It is easier to share and collaborate in Google drive if everybody has a Google account -which is free. You can create your account on:
https://accounts.google.com/signup/v2/webcreateaccount?flowName=GlifWebSignIn&flowEntry=SignUp (If it’s tricky; ask your mentor).
1. Open Google Drive. Tap the Google Drive app icon (mobile) or go to https://drive.google.com/ in your browser (desktop).
2. If you aren’t signed into your Google account, click ‘Sign In’ and enter your email address and password.
3. Select the ‘Upload’ button. Click ‘New’ in the upper-left side of the window (desktop), or tap + in the lower-right side of the screen (mobile).
4. Click on ‘File Upload’ (computer) or tap ‘Upload’ and ‘Photos’ and ‘Videos ‘(mobile or tablet). This will bring you to your folder/gallery structure.
5. Select a photo. Click on photo that you want to upload.
6. If you want to upload multiple photos at once on desktop, hold down the Ctrl key (Windows) or ⌘ Command (Mac) while clicking each photo you want to upload. To upload multiple photos at once on mobile, tap each photo that you want to upload (tap and hold photos on Android).
7. Confirm your selection. Click ‘Open’ (computer) or tap ‘Upload’ (mobile and tablet) to upload your photo(s).
8. On Android, tapping the image will upload it to Google Drive.
(Now you know how to add a file to Google Drive. Practice that. In a little while we will return to Drive and see how we can share and collaborate on files.)
2.2.3. Exercises
2.3 Collaborating and sharing practises through digital channels
Learning outcome: After completing this module you will be able to use technologies and media for teamwork and will know how to prevent cyberbullying.
2.3.1 Technologies and media for teamwork
Telephone
The majority of the people, in order to connect with others for everyday life activities or business, use mobile phone. Through the phone, you can send email, schedule a call, share documents etc.
Videoconferencing
It is another useful tool for group meetings. You may allow people to see each other while on a group call, using a variety of private or public services, such as Skype.
Example – Skype:
1. Work together with one or two learning partners, friends or co-workers to practice videoconferencing. Be sure your computer has a webcam.
2. Install Skype. For Windows users: Go to this link: http://www.skype.com/en/download-skype/skype-for-computer/. Click on the green button that says, ‘Get Skype for Windows Desktop.’ For Mac users: Go to this link: http://www.skype.com/en/download-skype/skype-for-mac/. Click button ‘Get Skype for Mac.’
3. Follow installer instructions.
4. Open Skype.
5. For Windows users: Press your Windows key, type ‘Skype’ and press ↵ Enter. For Mac users: Open up ‘Finder’, search for ‘Skype,’ then click on the program.
6. If the program does not show up after searching for it, try installing the program again.
7. Click on a contact. In the left side, you will find a list of contacts if you have any. To open a conversation with this person, click on the name.
8. Add each other by Skype-names. Click ‘Contacts’ on the top left of the screen, click ‘Add Contact’, then type your friend’s Skype-names.
9. Start a video call by opening the conversation window. For Windows users: Click on the icon in the upper right corner of the window that looks like a video camera. For Mac users: Click on the icon in the upper right corner of the window that looks like a video camera. Depending on version of your Skype, instead the icon you may see just ‘Video call’ option.
10. You may be asked for permission for Skype to use your video camera, click ‘Allow’ if you are comfortable with Skype having access to your camera.
11. Practice typical videoconference behaviour like muting the microphone when not speaking and sharing extra information (like URLs) in the chat during the conversation. You can also practice turning your camera off -how does that change the conversation?
12. End the call when done. Finish the call by pressing the red button (like on the mobile phone).
Cloud computing
To allow team members to access and share files from different locations, you can set up a platform allowing individuals to log in to a central data and document repository. Previously we learnt how to upload a file (a picture) in Google Drive. Now we will look at how we can give other people access to our files so we can collaborate. Note: a phone screen is not comfortable for working on documents, so it is best to practice on a desktop computer.
Google Drive
For this exercise you want to work with a learning partner: a friend, a co-worker or another student so you can practice sharing with each other.
1. Open Google Drive. Go to drive.google.com in your preferred web browser. You will be redirected to the main page.
2. If you aren’t logged into Google Drive, click ‘Go to Google Drive’, then enter your email address and password.
3. You can change the account you’re using with Google Drive by clicking the profile image (or letter) in the top-right side of the page, and then click the account you want to use.
4. Click the file you want to share. (It could be the image you uploaded in the previous exercise) This will select the file. If the file is stored in some folder, first open the folder (double click on the specific folder).
5. If you’re opening a photo or video, it will open in the same window.
6. Click the ‘Share’ icon. It’s an image of a person’s silhouette with a ‘+’ icon next to it. You may find it at the right side of the page. Clicking it prompts a window to open.
7. Type in the email address of your learning partner. Do it in the following field: ‘Enter names or email addresses’.
8. Select a sharing restriction level. Click the pencil-shaped icon, then click one of the following options:
- Can edit – Allows your recipient to make changes to the file.
- Can comment – This option allows your friend to comment on the document without any changes being made.
- Can view – Allows your friend to see documents but he or she will not be able to edit it or comment.
9. Click ‘Send’. It’s in the bottom-left corner of the window. This will send the file with your selected permissions to the specified recipient(s).
10. If you have worked on a shared desktop, we recommend you log out of your Google account when finished.
2.3.2 Cyberbullying prevention
Identifying Signs of Cyber Bullying
Unfortunately, there are bullies on the internet as well as in the real world. Our comfort level with others’ behaviour is individual. Please feel free to discuss symptoms and actions with your mentor.
Look for signs of harassment. Whether you’re worried that you might get yourself bullied, or you’re a parent concerned that your child is being bullied, looking out for a few warning indicators is a safe way to detect cyberbullying. Better safe than sorry. Bullying can happen in more open online platforms like Facebook, Twitter and Instagram and more closed like Snapchat. For young people game chats are also an important arena of social communication where bullying can happen. Demeaning language and insulting ‘humour’ and irony are a few warning signals. Remember that visual communication like images, memes and videos can also be hurtful. Being left out can be as hurtful as direct bullying, like not getting birthday greetings on social media accounts when everybody else are greeted.
Online impersonation is less obvious but just as harmful. At a personal level this could be an internet ‘troll’ making a fake social media account and post in the name of others or using your account to post insulting content on your behalf. This can happen if you are careless with your password or share a desktop and forget logging out of your social media account.
Taking action to stop the bullying
1. Ask the bully to stop their behaviour. If it’s possible to have a reasonable discussion with the person, ask them to stop.
2. Don’t respond to the bully’s messages. Sometimes ignoring the bully will make them get bored and you a less interesting target.
3. Block the bully on all online platforms.
4. Avoid sharing sensitive personal information online.
5. Don’t wake up the troll. Make sure you’re not inadvertently bullying yourself. Online communication can be tricky and people who are hurt can react with anger.
6. If there are threats or damaging bullying, and you consider outside help; Save the evidence (for example screen shots).
Getting outside help
1. Install parental control software or apps on your PC and smartphone.
2. On social media like Facebook and Instagram, you can click on a person’s profile and find a ‘report person/user’ link. You can also report posts and comments.
3. There are national organisations you can contact. In UK you can try https://www.nationalbullyinghelpline.co.uk/cyberbullying.html
4. If you feel you are threatened, contact the police.
2.3.3. Exercises
2.4 Netiquette
Learning outcome: After this module you will be able to act within the behavioural norms in online/virtual interactions, to develop active strategies to discover inappropriate behaviour.
Netiquette is short form for ‘Internet etiquette.’ It means the same as etiquette but in an online environment. Netiquette covers communication in social media, through emails, some web forums, game chats etc. This communication is usually in the form of written text, images and video clips.
Netiquette means to:
1. Avoid posting inflammatory or offensive comments online
2. Respect others’ privacy by not sharing personal information, photos, or videos that another person may not want to be published online.
3. Never spam others by sending large amounts of unsolicited email.
4. Show good sportsmanship when playing online games, whether you win or lose.
5. Do not troll people in web forums or comments on blogs by nagging or irritating them repeatedly.
6. When posting in online forums or commenting on photos or videos, such as comments on YouTube or Facebook, stick to the topic.
7. Don’t swear or use offensive language.
8. Even if you like somebody, they might not like you back. You cannot win them all -in love, in politics or in professional agreements. Just gracefully retreat and try somebody else.
9. If someone asks a question, and you are aware of the answer, offer help.
10. Thank others who help you online.
2.4.1. Exercises